
STONE VENEER SHEET INSTALLATION PROCESS
Stone veneers are one of the best and most affordable ways to give your wall a natural, stone-like look. You can choose from a variety of natural stone textures. The best thing about these panels is that they are lighter and easier to handle. Since they are so easy to handle, it is even easier to install them in your home.
So, if you are looking for step-by-step instructions on how to install stone veneer panels, you should read this article. Here you will find complete instructions on how to install these stone panels on your walls. But before you look at the process, take a look at the list of all the tools and materials you will need for the installation.
If you want to improve the interior of your home, consider installing stone veneers. These are lightweight and give your space a natural feel. To install these panels on your walls, follow these steps.
Tools and Materials Required
Here is the list of all the tools and materials required while installing the natural stone veneer into your home.
1. Stone Cutting Tool 2. Mortar Box 3. Grout Bag 4. Hoe For Mixing 5. Wire Brush 6. Hammer 7. Stone Veneer 8. Nails 9. Expended Metal Lath 10. Mort er Sand
11. Type S or N Mort er 12. Aviation Shears 13. Scratch Comb 14. Vinegar 15. Masonry Trowel 16. Pointing Tool
Stone Veneer Sheet Installation Process
Step 1 – Calculation is Important
The first and most important step is to calculate the materials you will need. Calculate how much stone you will need, and if your project includes corner stones, calculate accordingly. You will need to subtract about 1 square foot for each linear foot of corners. Also consider the size of the joints between the stones to get a rough idea of the amount of mortar you will need.
Step 2 – Preparing The Surface
Preparing the surface is one of the most important things you need to do. It prevents water damage and ensures that your slabs will remain stable for years to come. However, surface preparation is different for every wall.
For exterior walls made of form work panels, plywood panels or flush metal siding
If you want to install these panels on your exterior walls and they are made of sheathing, plywood siding or flush metal siding:
- Consider applying a weather-resistant barrier to the surface.
2 .Install metal lath on the weatherproof barrier in accordance with local building codes, using galvanized nails or screws spaced 6 inches apart vertically and 16 inches apart horizontally, penetrating at least 1 inch into the studs.
3.Stop the metal lath 1 inch from the edges with a finish.
4.Carefully overlap the metal lath and wrap all corners at least 5 inches apart.
5.Always overlap joints 4″ for shingles.
For exterior walls, use sheetrock, fibre cement board, plywood or green sheetrock
For interior walls made of sheetrock, fibre cement board, plywood or sheetrock, you do not need a weather-resistant protective coating to cover the surface. If you use the same process for exterior walls, you are good to go.
For masonry, stucco, cleaned or untreated concrete walls
If you have exterior or interior masonry, stucco, cleaned or untreated concrete walls, you can apply stone veneer directly to the surface. You will need to etch the concrete surface with an etchant if there are release agents on the surface. Also, make sure the surface is free of dirt, dust or paint. If the surface is too difficult to clean, you can apply the metal lath on the surface. The remaining steps are the same as described above.
Step 3 – Applying The Scratch Coat
Now it’s time to apply the scratch coat of N or S type mortar. If you want your mortar mix to be of good quality:
Mix one part N or S cement and 2.25 parts sand. You can also use this mortar for bonding and grouting the joints.
Once you have the mixture ready, apply it in a ½ to ¾ inch thick layer over the entire surface.
Allow the layer to dry for at least 24 hours before you begin installing the stone facing tiles.
Step 4 – Prepare The Stone Veneer Panel
Before you apply the panels to the walls, wash them and lay out the stones on a flat surface to determine the right arrangement, you can try different ways of wall design. When applying the stone veneers, make sure that they are damp so that they do not absorb moisture from the mortar. This will also ensure that the stones do not need to be cut to size.
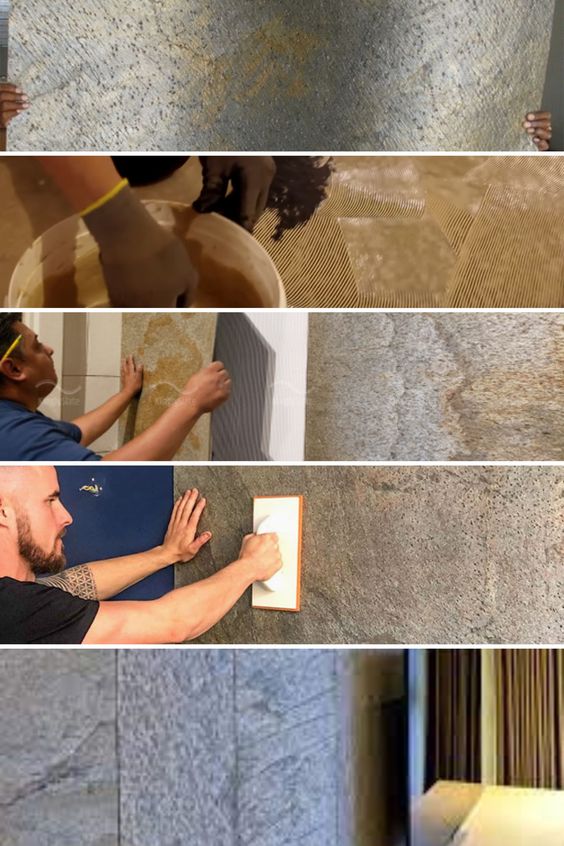
Step 5 – Attaching The Stone Veneer Panels
Now it’s time to apply the stone veneer to your walls. Apply a ½ inch thick layer of mortar to the back of each stone piece and to the scratch coat. Remember to apply the mixture in small areas so the mortar does not dry out. Once you have applied the mortar, begin laying the pieces. It is best to start in the lower corner of the wall. These panels perfectly resemble the look and feel of wall cladding made of natural stone.
Step 6 – Grouting The Joints
Use the same mortar mix you used for the scratch coat and adhesive mortar to fill the joints between each piece of stone. Fill the joints with a ½ inch thick layer of mortar. Once you have filled the joints, clean the entire surface.
Conclusion:- With these six simple steps, you can apply stone veneer panels to your walls and give your home a natural look and feel.